


Special Article - Year 2020 - Volume 35 -
Speed in surgery: 10 quick tips to increase confidence and manual training on the young plastic surgeon
Velocidade em cirurgia: 10 dicas rápidas para elevar a confiança e o adestramento manual do jovem cirurgião plástico
Gibran Busatto Chedid1,* ; Paula Girelli2; Carlos Oscar Uebel1
ABSTRACT
The purpose of this article is to show 10 quick tips that aim to aid in the development of confidence, improvement of manual skill, and surgical planning in the daily training routine of the young plastic surgeon; skills capable of reducing overall surgical time without compromising the meticulousness of the movements performed.
Keywords: Teaching hospitals; Plastic surgery; General surgery; Motor dexterity; Learning curve.
RESUMO
O presente artigo tem como objetivo demonstrar 10 dicas rápidas que tem como alvo o auxílio no desenvolvimento de confiança, de melhora da habilidade manual e de planejamento cirúrgico na rotina diária de treinamento do jovem cirurgião plástico; habilidades capazes de promover redução do tempo cirúrgico global, sem comprometer a meticulosidade dos movimentos realizados.
Palavras-chave: Hospitais de ensino; Cirurgia plástica; Cirurgia geral; Destreza motora; Curva de aprendizado
INTRODUCTION
Learning and developing surgical skills is an active process that requires commitment and effort. We can identify three main stages of this learning process. The first stage consists of a cognitive phase that involves receptive learning techniques that include reading and also listening and watching specific tasks. The second stage of learning consists of an integrative guided process that allows the cognitive techniques learned to be incorporated into a structure that qualify the beginning surgeon to perform the steps of a surgical procedure. However, still, without the presence of fluidity obtained only with the continuous practice and experience that characterizes the third and last stage. In this autonomous phase, the surgeon gains confidence and self-direction of decisions without supervision from a more experienced surgeon.
In the 1890s, William Stewart Halsted became the first chief surgeon in the Johns Hopkins Hospital surgery teaching program in the United States, and thus the embryo of what would be the medical residency program was created. Over the years and the development of medical specialties such as plastic surgery, since the dawn of medicine, surgeons around the world have learned from the master-apprentice model by following the observation, action, repetition, and teaching of the acquired technical acts. The development of an excellent manual technique is essential for the safety of the surgical procedure that must be performed smoothly and in a linear manner. The brief operative time considerably reduces the patient’s exposure to surgical trauma. This lesser exposure to movements imposed by the surgeon, generates a less inflammatory response to surgical trauma, with less stress hormones release, less risk of thromboembolic and infectious complications, less time of exposure to anesthetics, and, therefore, less overall risk of intra and postoperative complications.
Let us see the words of the exponent of world plastic surgery Sir Harold Gillies, who already had the principle and taught his disciples the following maxim: “speed in surgery consists of not doing the same thing twice”. In order for us to accomplish this feat of following the steps of surgery linearly and synchronously, we first of all need to be prepared both at the level of surgical planning and at the technical level, so that we can thus avoid the need for repairs to our movements intraoperative, generating a surgical procedure driven by fluidity, synchrony, and safety1,2,3.
OBJECTIVE
The present work aims to show 10 quick tips to aid in the development of confidence, improvement of manual skill and surgical planning in the daily training routine of the young plastic surgeon, producing an improvement in the overall operative time without compromising the meticulousness of the movements performed.
METHODS
Tip number 1 - Planning the surgery: the “airplane pilot” mode
We recommend that the day before the surgery, step-by-step written planning to be used at the time of the operation is carried out. A preoperative checklist realization, with all the steps to perform during the surgery, is a great way that serves as a guide during the surgery performed. When performing the manual description of the surgery to be made, all steps to be completed must be carefully memorized, repeating the checklist and reading it carefully so that it is unnecessary to check during the procedure, verifying it only in cases of need.
We compare the realization of the surgery planning at this moment, to which the pilot of aviation preparing for an intercontinental trip carries out. He prepares his travel plan, records it in the logbook, and foresees all the steps and directions to be used in the trip and checks all materials, items, and devices to be used. Therefore, avoid maneuvers and unplanned situations, anticipating and reviewing until the complete memorization of the step by step of the surgery in question.
Tip number 2 - Preoperative marking: writing the map of the mine
With a thorough preoperative marking, the novice surgeon avoids the temptation to modify the surgical plan previously established to carry out the surgery. We recommend that the marking be done in a quiet environment, without haste, before anesthetic induction, in an appropriate room (office), with the patient in a comfortable position and informed of the need for such drawings. The drawings must be accurate, following the patient’s natural relief. We use here, colored pens for different anatomical divisions, which will help guide us when making the incisions. Marking the patient before entering the operating room avoids the use of time in the operating room, speeds up the work of the anesthesiologist and nursing professionals, and avoids unnecessary movements because planning changes. At that time, the plastic surgeon must have all the patience and thoroughness in the execution of the drawings, meticulously made, so that at the moment of the surgery, he only needs to follow the paths indicated by the previously planned and drawn lines. Always remembering this principle: surgery begins in the office.
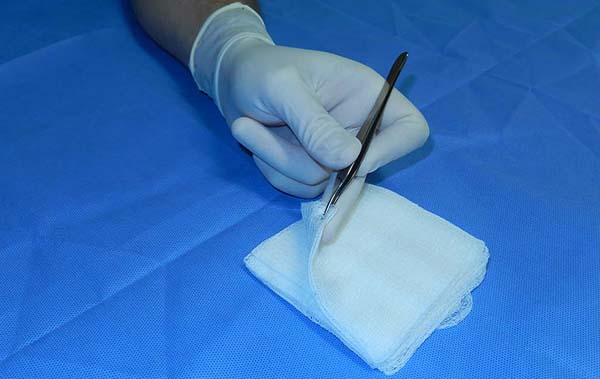
Tip number 3 - Holding the scalpel: supported violin bow technique
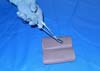
Once the preoperative planning and marking are completed, we proceed to the start of our actual surgical work. The correct handle of the scalpel can be important to perform an effective and precise dieresis, obeying anatomical plans, avoiding accidents and unwanted movements. We recommend the position we call the supported violin bow, where the surgeon wields the scalpel handle between the first, second and third fingers, using the fifth finger extended to form an angle of support with the incised surface, using it as a guide for stabilization and depth of movement. (Figure 1). The support of the tip of the fifth finger on the adjacent skin promotes, in large incisions, when necessary, the precise shape, ensuring the blade in a position perpendicular to the tissue to be incised, avoiding deepening of the dieresis zone.


Tip number 4 - Fine-tuning: Avoiding tremors with the supported wrist technique
To proceed with precise movements, especially in delicate areas such as the face that have essential anatomical structures, we need to work with maximum precision in our movements. Here we recommend using the supported wrist technique. By supporting the wrists on the operating table or even gently on the patient’s body areas adjacent to the incision, we can avoid small tremors resulting from the surgeon’s muscle stress. Widely used during surgeries using microscopes, this simple technique offers excellent precision in the movements performed. In cases where the wrists cannot be supported on the table, such as during the cauterization of a deep area or in the making of the pocket for breast implant prosthesis, we can use our own anterior superior iliac spines as support. By supporting the elbows on the flanks, on top of the anterior superior iliac spines, the plastic surgeon acquires a support base to perform the precise movement, imitating the support of the wrists on the operating table in cases of positional impossibility.
Tip number 5 - Finger extension: the anatomical forceps
The anatomical forceps are widely used in plastic surgery in practically all procedures performed under the body surface. Correct gripping of the forceps between the fingers can save time and offer a comfortable working position, avoiding unnecessary tissue handling and trauma in unwanted areas.
We recommend that the anatomical forceps be used between the first and second fingers, making use of the third finger to support the dissected tissue, generating a slight protrusion of the tissue, carried out with the internal rotation of the wrist and exposure of the tissue fibers to dissected, thus maintaining a better approach and a 90-degree dieresis angle concerning tissue fibers (Figure 2).
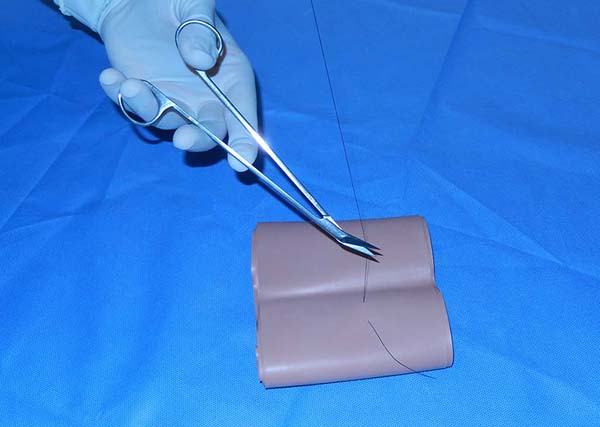
Tip number 6 - Suturing: flat needle holder technique
Holding the needle holder impaled with the upper ring touching the hand’s thenar eminence and with the fourth finger resting on the lower ring, we can perform the movement of opening, gripping, and closing the rack more quickly and accurately. A small medial movement is performed with the region of the thenar and lateral eminence with the fourth finger, generating friction of the needle holder’s upper ring at the thenar eminence and thus opening it with a short and precise movement under the flat hand. When performing the suture, we used the needle holder’s angled removal, already positioning the needle for the subsequent movement. This technique is widely used in performing large plications as in abdominal surgeries that require large amounts of stitches to be performed. Here, when inserting the needle at the end of the tissue to be sutured, the surgeon first performs an internal rotation movement with the wrist passing 3/4 of the needle area between the tissue (Figure 3). Once this movement was carried out, the surgeon now performs an external rotation of the wrist, attaches the needle end to the tip of the needle holder again, removing it from the tissue and thus with a 180-degree rotation movement of the needle holder, leaning on his first and second fingers, reestablish the position for the next movement. Thus, the needle - needle holder complex is already prepared, not requiring the needle’s manual repositioning at the tip of the needle holder.

Tip number 7 - Using your left hand: understanding the scissors shear
The training of both hands to perform surgical movements is extremely important for an optimal operative time. The use of surgical scissors with the left hand is necessary in cases where we do not have proper spatial positioning on the tissues to be dissected or threads to be cut with the right hand. The surgeon can make a precise cut with the surgical scissors positioned in his left hand. We start with an understanding of how scissors produce their cut. The scissors have two blades that, once articulated, perform the tissues’ dieresis using the principle of the action of mechanical shearing forces, applied under lever motion. Thus, in cases where it is necessary to use surgical scissors on the surgeon’s left hand, it is recommended to support it with the second finger under one of its rods, for better positioning of the cut and performing opposite traction movements of the blades, with the help of the first and third fingers of the left hand positioned on the rings of the instrument. The first finger makes traction in the upper direction, and the third finger performs the movement in the lower opposite direction, generating the shearing movement and producing the cutting of the proposed tissue (Figure 4).
Tip number 8 - Observe, realize, and teach: learning to learn
The observation of more experienced surgeons is of the paramount value for the development of the mastery of the apprentice surgeon. By carefully observing the movements of a senior surgeon, we try to pay attention to the small details of his movements’ fluidity and the stages of the surgery in which he gives greater or lesser speed to his maneuvers. We recommend observing the most significant number of different surgeons and different surgeries. After observing and memorizing the steps and maneuvers, we then try to repeat them in our daily surgical practice, respecting each professional’s surgical style and personality. The learning pyramid shows that 20% of what we memorize and retain comes from audiovisual media, 75% of what we practice, and 90% of what we can teach. We, therefore, recommend that you learn to teach in order to learn 3,4.
Tip number 9 - Identifying errors with the mirror effect
One of the most significant benefits that we can have in our journey to surgical mastery is the knowledge of the art of recognizing our own mistakes. The early identification of defects and manias must be carried out, and such mode must be set aside. The advent of portable video cameras is of great value so that the young surgeon can closely observe his way of operating. Maintaining the habit of videotaping the surgical procedures helps to improve the surgical style, which must always be precise and gentle with the tissues handled.
Tip number 10 - Keeping the focus: respecting the patient’s integrity
The moment of the surgery requires total and absolute concentration from the plastic surgeon. Small distractions can be catastrophic during the manipulation of delicate structures that can easily generate irreparable sequelae, both physically and psychically, and with unsatisfactory results for the patient and the surgeon. We must have the habit of demanding maximum silence and concentration inside the operating room, avoiding distractions with music and side conversations that should be left for leisure hours. Even small, seemingly tiny distractions can ultimately increase the time of surgery, the risk of unplanned untimely movements and the risk of serious injuries, such as nerve injuries, so difficult to repair. The surgical procedure must be seen as a moment of total respect and dedication to the patient who gives us permission and confidence to exercise our work on his valuable and unique body. For this solid relationship of trust to be honored, the surgeon must remain in absolute concentration during his medical act, maintaining serenity, calm, and active posture in the face of surgical movements.
RESULTS
With the use of the ten tips, the novice plastic surgeon has the opportunity to obtain a possible improvement in his surgical time, reducing the time of exposure of the patient to operative trauma, avoiding the most adverse situations and seeking the benefit and maintenance of his patient’s health, without losing the meticulousness in performing a plastic surgery procedure. Countless factors are of relevance when it comes to surgical competence and ability. Elements such as knowledge, communication, decision-making ability, and psychological characteristics are factors that can be compared and analyzed, however, measuring the skill and technical competence of the young surgeon who begins his training in plastic surgery is always difficult to perform. In order for there to be an adequate and stimulating level of learning for the young plastic surgeon, the supportive relationship between colleagues in the medical residency programs must be emphasized and the strengthening of the bonds between the teaching staff and the students5. Different teaching methods must be encouraged so that the beginning surgeon has a wide range of ways of absorbing the daily technical practice of our specialty.
DISCUSSION
Technical learning is closely linked to an initial cognitive phase in which instruction for the task occurs with a demonstration by the instructor (teacher/preceptor), which must be based on trust and respect and followed by the acquisition of knowledge. Subsequently, an associative phase takes place, in which the repeated practice of the task associated with the instructor’s “feedback” to eliminate the possible errors of the practiced task, consequently generates the acquisition of the sought skill. At the end of these two initial stages, the plastic surgeon in training is faced to an autonomous phase where the self-sustained performance of tasks occurs, practically without the need for corrections and developing the habit of teaching6,7.
CONCLUSION
The way we learn is decisive in the development of how we will teach, so the attention to learning and teaching techniques guided by close professional ties must be continuous, daily, and continually evolving, encouraging repetition, study, observation, and technical-scientific production8,9,10. We can use our quick tips that, combined with the daily practice routine, bring one more proposal regarding the teaching and learning method, emphasizing the development of the habit of observation, action, and teaching. It offers the novice plastic surgeon an effective method of technical improvement, based on meticulous planning and active posture so that during the operation there is a low rate of surgical trauma, an increase in confidence in performing tasks and, especially, the path to our final destination: the safety of our patients.
REFERENCES
1. Bamji A. Sir Harold Gillies: surgical pioneer. Trauma. 2006;8(3):143-56.
2. Gillies SH, Millard DR. The principles and art of plastic surgery. London: Butterworth & Co.; 1957.
3. Kotsis SV, Chung KC. Application of the see one, do one, teach one concept in surgical training. Plast Reconstr Surg. 2013 Mai;131(5):1194-201.
4. Khan MS, Bann SD, Darzi AW, Butler PEM. Assessing surgical skill using bench station models. Plast Reconstr Surg. 2007;120(3):793-800.
5. Rohrich RJ, Weber RA. Are teachers born or do they develop over time?. Plast Reconstr Surg. 2012 Mai;129(5):1209-11.
6. Grunwald T, Krummel T, Sherman R. Advanced technologies in plastic surgery: how new innovations can improve our training and practice. Plast Reconstr Surg. 2004 Nov;114(6):1556-67.
7. Kopta JA. The development of motor skills in orthopaedic education. Clin Orthop Relat Res. 1971 Mar/Abr;75:80-5.
8. Collins A, Brown JS, Newman SE. Cognitive apprenticeship: teaching the crafts of reading, writing, and mathematics. In: Resnick LB, ed. Knowing, learning, and instruction: essays in honor of Robert Glaser. Hillsdale, NJ: Lawrence Erlbaum Associates; 1989. p. 453-94.
9. Clark CI, Snooks S. Objectives of basic surgical training. Br J Hosp Med. 1993 Out;50(8):477-9.
10. Baldwin PJ, Paisley AM, Brown SP. Consultant surgeons' opinion of the skills required of basic surgical trainees. Br J Surg. 1999 Ago;86(8):1078-82.
1. Sociedade Brasileira de Cirurgia Plástica, Porto Alegre, RS, Brazil.
2. Ernesto Dornelles Hospital, Residency in General Surgery, Porto Alegre, RS, Brazil.
3. São Lucas Hospital, Pontifícia Universidade Católica do Rio Grande do Sul, Porto
Alegre, RS, Brazil.
Corresponding author: Gibran Busatto Chedid, Rua Mostardeiro, 157, Sala 606, Porto Alegre, RS, Brazil. Zip Code: 90430-001. E-mail: gichedid@hotmail.com
Article received: April 01, 2019.
Article accepted: July 15, 2020.
Conflicts of interest: none.
 Read in Portuguese
 Read in English
 PDF PT
 Print
Print
 Send this article by email
 How to Cite
 Mendeley
 Pocket